MixDEM Help - Introducing the Editor
I - Configuration
I - 1 - The Web Service API
 If you are the administrator of the
MixDEM Engine you can change or specify the user login :
If you are the administrator of the
MixDEM Engine you can change or specify the user login : $GLOBAL_USER_EMAIL
and password : $GLOBAL_USER_PASSWORD on MixDEM Engine
configuration file : ./_LIB/ETL.config.php.
Default user login and password are :
$GLOBAL_USER_EMAIL    = "example@example.com" ;
$GLOBAL_USER_PASSWORD = "password"            ;
I - 2 - The MixDEM Editor
The MixDEM editor lets you edit, test, and manage your applications in an interactive
development environment written in HTML, CSS and JavaScript to run on any modern browser.
To use the editor, you have to open ./gui/index.html, and all that you need is :
- The Web Service API URL, the application programming interface of MixDEM ETL Engine
- The User login and password to gain access to the api.
II - Authentification
II - 1 - Welcome page
The Welcome page consists of the authentification form .
II - 2 - Account sign in form
Just enter the Web Service API URL, your user account name
and password, and you're ready to begin!
II - 3 - Authentification Error
II - 3 - 1 - Error API URL
If you have entred an invalid or inaccessible api url, the editor will display this
error mesage!
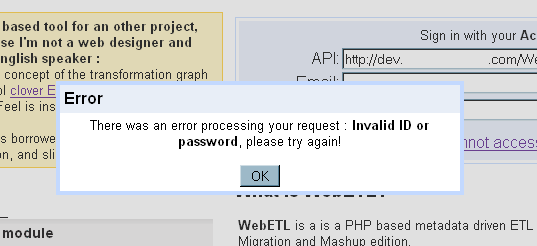
II - 3 - 2 - Error Email and Password
If you have entred an invalid login or password, the editor will display this
error mesage!
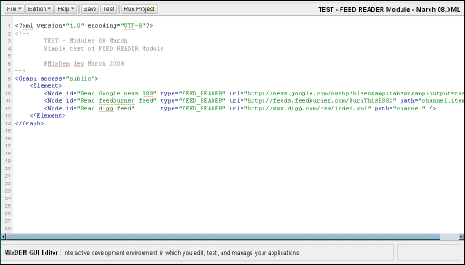
III - GUI Editor
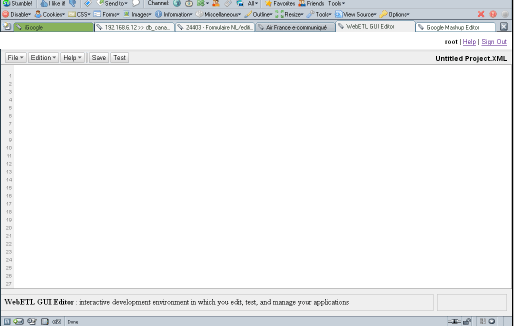
III - 1 - Work space
The editor consists of the following three panes:
- the Menu at the top of the browser window. Tt displays a
collection of options and functions that you can use to edit you
application.
- the Text panel in the center is the main work area,
where you can edit XML code on it. The editor provide an optional
syntax highlighting for your source.
- Status bar appears at the bottom of the browser window.
It tells you what is going on while you are on the editor.
III - 2 - Editor Menu
The Editor Menu consists of the following three collections :
- The "File" menu
- The "Edition" menu
- The "Help" menu
III - 3 - Editor File Menu
The "File" menu, can be used for a variety of purposes including creating, saving and testing your application.
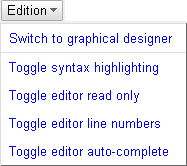
III - 4 - Editor Edition Menu
The "Edition" menu, allows you to manage the Integrated Development Environment.
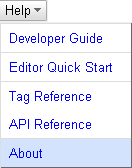
III - 5 - Editor Help Menu
The "Help" menu, contains commands that assist you while you are working with the editor.
III - 6 - Text Editor
MixDEM GUI Editor use the CodePress
Text Editor the web-based source code editor with syntax highlighting
written in JavaScript that colors text in real time while it's being typed
in the browser.
Text Editor Features
- Real-time syntax highlighting
- Code snippets ex: type "<Graph"
and press [tab]
- Auto completion ex: type " or (
or ' or [ or { or $
or @
IV - GUI Editor Dialog Boxes
IV - 1 - Opening project list
To open the list of existen project on the server use the
FILE
menu

then click
Open Project, or
unfocus the codepress editor and use the shortcut "
Alt + Shift + O"
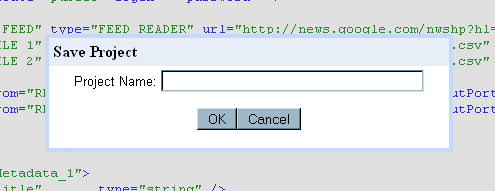
IV - 2 - Saving project on the server
To
save a new project on the server use the
FILE
menu
then click
Save Project or
Save AS ..., or unfocus the codepress editor and use the shortcut "
Alt
+ Shift + S"
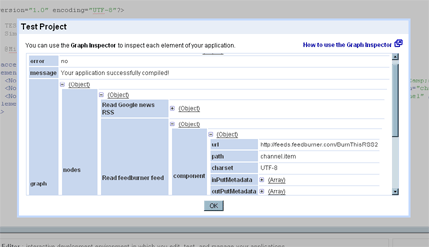
IV - 3 - Testing project & application inspection
To
test your project, use the
FILE menu
then click
Test Project or shortcut button
 Test
Test, or unfocus the codepress editor and use the shortcut "
Alt
+ Shift + T"
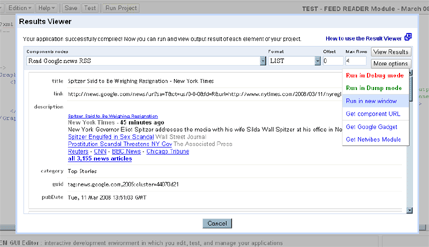
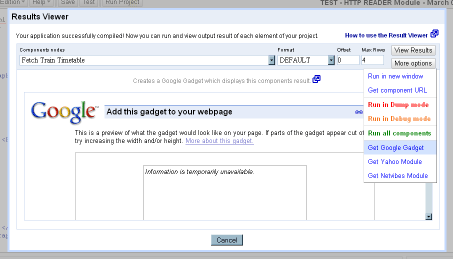
IV - 4 - The Results viewer
To
run your project, use the shortcut button
 Run Project
, or unfocus the codepress editor and use the shortcut "
Alt
+ Shift + R"
-
Click on
View results 
button to Run, Reload or Refresh output result of the selected node, or select
Run all components on
More options 
menu to run all application components.
-
From the Results viewer, you can select one of the Format supported by the MixDEM API ( XML, JSON, ...), specifies how many records/rows should be skipped (Offset) and specifies how many records/rows should be read (Max Rows).
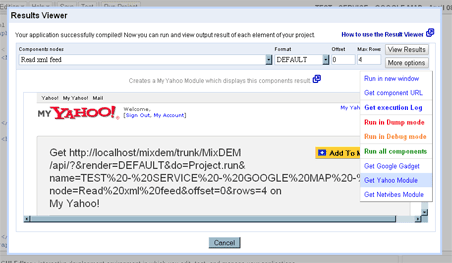
The
More options menu contains some advanced options :
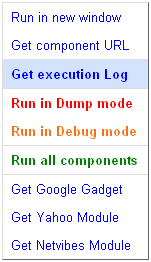 |
| Run in new window |
Run and open the result on a new window |
| Get component URL |
Return the url to access to this component result.
Notes:
- This url can be used to acces to output result of the selected Component node from the WEB API
- To access your projects in Web API, use the following URL format :
http://YOUR_API_HOST.com/?&render=mode&do=Project.run&name=project&node=name
- Access to this web service can be on "Public" or "Private".
If access mode is set to Private :
- The user must sign in to a MixDem GUI to use this application, or
- The can add the login an the password in the URL on the following format :
YOUR_WEB_APPLICATION_URL&login=<USER NAME>&password=<USER PASSWORD>., or
- If not, the API will use the Basic access authentication.
|
| Get execution Log |
Open the Log of the last executed project on a new window
|
| Run in Dump mode |
Run and display "all" internal status messages. |
| Run in Debug mode |
Run and display some "debug" messages. |
| Run all components |
Run all application components |
| Get Google Gadget |
Generate a Google Gadget
|
| Get Yahoo Module |
Generate a Yahoo Module
|
| Get Netvibes Module |
Generate a Netvibes Module
|
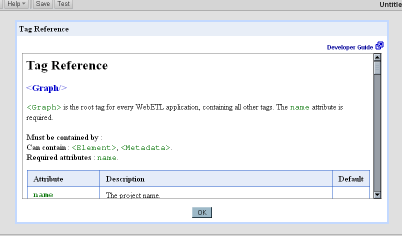
IV - 5 - Tag Reference - help
To access the Tag Reference help , use the menu
Help 
then click
Tag Reference, or unfocus the codepress editor and use the shortcut "
Alt
+ Shift + F2"
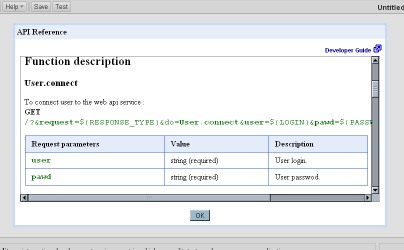
IV - 6 - API Reference - help
To access the API Reference help , use the menu
Help
then click
API Reference, or unfocus the codepress editor and use the shortcut "
Alt
+ Shift + F3"